I'm presuming you're reading this because you're interested in venturing out from under the auto umbrella. This post is what I regard as the very foundation of successful photography - Exposure - a word that gets used to describe the amount of light we allow the camera to capture.
1: Why does it matter?
Summary
Very simply, if we allow the camera to capture too much light, then the whole picture is white. If we dont allow the camera to capture enough light, then the whole picture is black.
A Bit More Detail
You might be thinking, well whats the big deal, my eyes get it right in all sorts of different places? You would, however, be missing quite how marvelous the eye is.
On a bright sunny day, outside in the sun at the equator, the light is streaming down and bouncing joyously around, higgledy piggledy. If I measured light in bananas[1], then there might be 100,000 of them on such a day.
On a very dark day, like the sort of sullen apology for a day we get here in England in Manchester in the middle of January, there might only 100 bananas. Thats a thousand times less light and yet apart from feeling a bit grumpy with everyone, we barely notice. Some might argue that Manchester just does that to people anyway.
If we went out on a moonlit night, there is only one tenth of a banana. For sure we notice that's darker than the day but on the whole we have no problem getting about in it. The other day I drove a car at 70 mph on a deserted motorway (highway) by moonlight alone just because I could. It's a thousand times less than our miserable Manchester midwinter morning and a million times less than the bright sunny day with which we started.
A millionfold variation in light levels is a bit much to ask of our cameras. In any case, you may also have noticed that in morose Manchester you can still see white paper and dark shadows just like you can in the sun, so clearly our mind or eyes (or both) is making something a thousand times darker (the piece of paper in Mizzogville) still appear white, just like it does in the sun.
So you can see that actually it is something of a big deal. A good camera can capture, in a single image, something like a thousandfold difference between something very light and something very dark. If we set the camera to capture our 100,000 bananas in the equatorial sun as fully bright, then we took it to Mank City it would only see darkness.
All this means we need a way to control the amount of light coming into the camera.
2: How Do We Do It In Theory?
Summary
In summary we've got the size of the hole (aperture) and the length of time it's open (shutter speed), and they are both defined in such a way that the familiar definitions give us something where a bigger number means less light. One thing that is very convenient is that one step (stop) of aperture changes things the same amount as one step (halving or doubling) in shutter speed, so we can to some extent dance between them.
Most modern cameras are capable of working in one-third steps, so in fact there are two finer choices available between, say, 1/250th and 1/125th, but that's a bit of a detail and doesnt really change the fundamentals.
A Bit more Detail
The camera is a light-gathering device. It captures the constant rain of light[2] in a bucket, then measures how much light in the bucket and writes it to an electronic file. Actually its a lot of little buckets to give you lots of points of information to define the picture. If we let too much light in then all the buckets are full and the file is completely white. If we don't let enough light in then there just some tiny splashes in the bottom of the buckets and the file is more or less completely dark.
Getting control is not very complicated, we have a hole and a cover over the hole. We can control the size of the hole and control for how long we uncover it.
The size of the hole doesn't sound grand enough, so we are inclined to call it aperture because it makes us feel better. Its also sometimes referred to as an f-stop, often with a flamboyant long f. Its not time to get mired in details about why its called that or where it comes from you dont really need to know that unless you are going to design lenses.
The really irritating thing for me about f-stops is that a little number means a big hole and a big number means a little hole. Whose idea of a good idea was that?
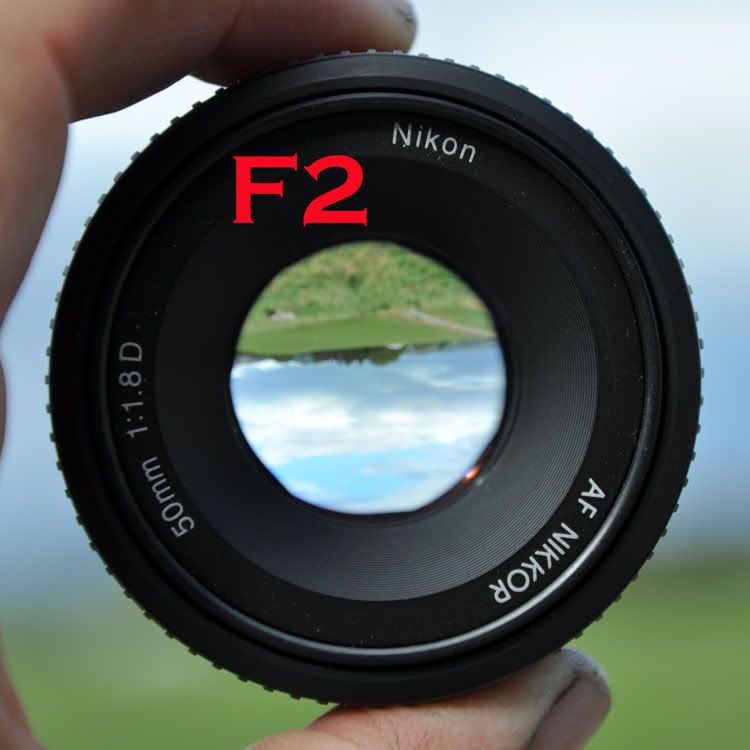
A big hole, also known as f-stop 2 or just f2
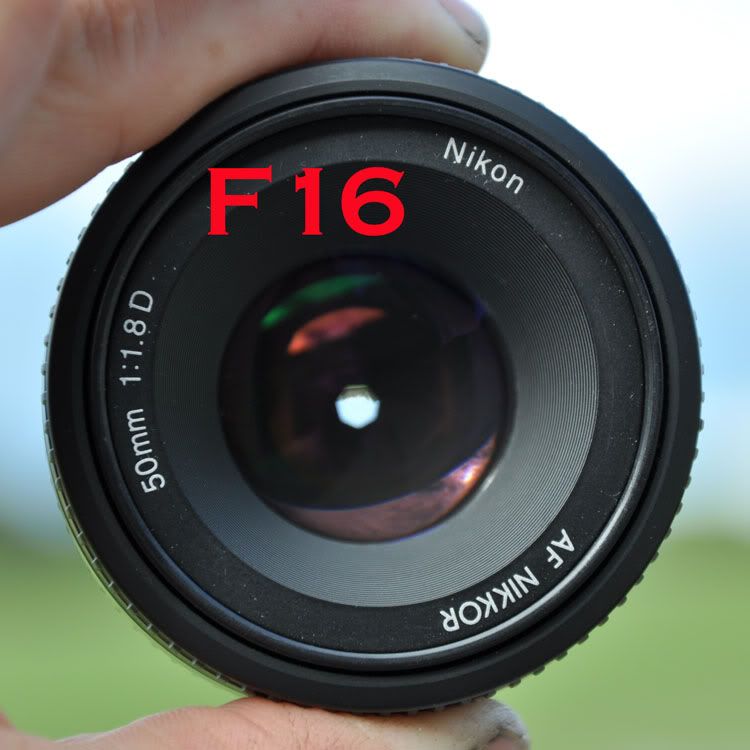
A little hole, also known as f16
f-stops go in a non-obvious progression, evidence of true genius at work, with twice the area of hole being signalled by (drum roll) a factor of the square root of 2. Dont worry, because you don't really need to know about it. If you're an apologist you might point out that a doubling of the area means an increase of 2 in diameter. I don't care, theres no excuse for having such an inaccessible set of numbers that I'm supposed to use when I'm cold, wet and tired. Anyway, enough of my grumbling.
There is a pattern of numbers which used to be engraved on lenses in the good old days, but is now displayed in an LCD panel[3]. This pattern goes something like:
1.4 2 2.8 4 5.6 8 11 16 22 32
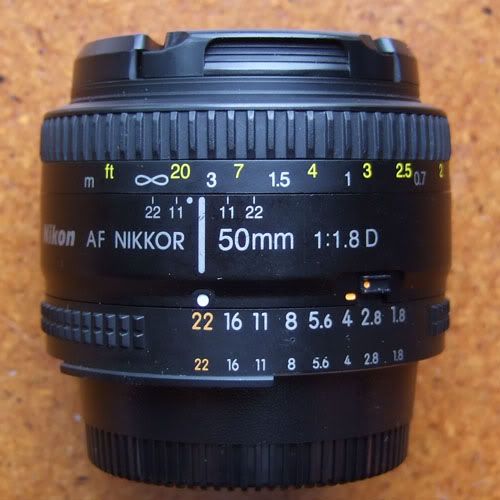
Your camera and/or lens might not have all those numbers but it will probably have some recognizable subset of them.
Each of these intervals is equal in terms of the change it makes, and each is known as 1 stop or 1 f-stop. I tell you this so you can uncover the next bluffer who crosses your path, rather than so you can memorise it - I won't be testing you on it. As I got cross about earlier, a bigger number means a smaller hole. Although it doesn't look very obvious, you soon get used to counting clicks on your camera as you set these numbers, so it doesn't actually matter if the sequence makes no sense to you.
The other primary control - I'll come onto what I mean by that in a minute - is how long we uncover the hole for. This is referred to as shutter speed. Yet again we want to work with steps that halve or double the amount of light in order to get control of exposure.
Yet again, some genius of terminology decided that working with ordinary numbers is too easy[4] and so the numbers on your camera are the bottom line of a fraction, giving you the time in seconds your shutter is open. So when your camera says 250 it actually means the shutter is open for 1/250th of a second. If you want more light, you need it open for longer. Is that 125 on the dial or 500? Yeah, see what I mean about the genius bit? It's 125 on the dial, because that means 1/125th of a second, which is 2/250ths of a second. This notation gets a bit inconvenient if you hold the shutter open for a very long time, if youre using a tripod for example, so the camera will add double quotes after the number if it is in whole seconds - thus 2 means half a second and 2" means 2 seconds.
In summary we've got aperture and shutter speed and they are both defined in such a way that the familiar definitions give us something where a bigger number means less light. One thing that is very convenient is that one stop of aperture changes things the same amount as one step (halving or doubling) in shutter speed, so we can to some extent dance between them.
Most modern cameras are capable of working in one-third steps, so in fact there are two finer choices available between, say, 1/250th and 1/125th, but thats a bit of a detail and doesnt really change the fundamentals.
3: How Do We Do It In Practice?
To take complete control of the camera, set in Manual mode. This is probably marked as M and details of how to do it for your camera are in the instruction book that came with it - it's difficult for me to describe it for every possible camera. You're looking for something marked mode, or possibly PSAM, or on Canon cameras PTVAVM.
When you look through the camera and half press the release button, you will see some sort of meter display in the viewfinder. It normally consists of a group of vertical or horizontal ticks, with 0 in the middle and going from +2 to -2. These numbers are the same as one move on the aperture scale or a halving or doubling of shutter speed and are referred to as stops. A 1-stop difference is a halving or doubling of the amount of light the camera collects.
Basically what you do is twiddle with aperture and/or shutter speed until the meter reads 0, and then you have about the right amount of light for the scene. If the meter reads low, keep reducing the aperture and/or shutter speed numbers (remember that smaller numbers mean more light) until it arrives at the middle (bear in mind if you are way off, the meter will be just stuck at +2 or -2 until you get somewhere close).
Trust the theory and it will get you there bigger numbers, less light, smaller numbers, more light.
4: That Sounds Too Easy?
Well, yes. There are a couple of wrinkles you may encounter.
The first and most obvious one is that some of the choices the camera will let you make might well be bad for your pictures. It isn't your mother and it wont stop you from doing things that might turn out unhelpful. In the days of film, if you didn't know this, you wasted a lot of film. Ask me how I know.
The Big One
The big one is that the hole is open for so long that you can't hold the camera still to get a sharp picture.
Typically, the hole is open for a really short period of time and so it's no problem, but if you make the hole very small and there isn't much light, you will find the hole needs to stay open for longer and longer. If you don't know the focal length[5] of your lens, then try and keep the shutter speed number above 60 (or below 1/60th of a second if you prefer to think of it that way). If you do know the focal length of your lens, try and keep the shutter speed number above the focal length. So if you have a 200 mm lens, try not to go lower than about 250 on the display or 1/250th of a second[6].
If you are indoors then you might find you are at the lowest aperture number (sometimes referred to as the "widest", or even more confusingly the "biggest") and your shutter speed is nowhere near high enough. When I was a boy that meant you either got out a flash gun, loaded some fast film or just put the camera down. These days, professional cameras like the Nikon D3S can take perfectly acceptable pictures in light in which it is difficult to read unaided and so there is no need to resort to mood-ruining flash.
The key to this is rate at which the camera counts bananas[7], often referred to as the ISO setting.
On one of our really bright days, we count bananas 100 at a time. If there are less than a thousand bananas reflected from something then it looks black in the picture and if we get 100,000 bananas it looks white. In Miserable Manchester meanwhile, we count bananas 0.1 at a time. 100 bananas looks white and 0.1 - one tenth - of a banana or less looks black.
The rate at which we count bananas is the ISO setting. "ISO" stands for International Standards Organisation and so ISO is a shorthand for ISO 12232, a standard procedure for defining banana-counting rate in digital photography. As you can see, there are at least 12231 other standards which cover everything from the colour-fastness of toilet paper to the requirement for a condom to stretch 600%. Im not making up either of those. When I was a boy, film speed was referred to as ASA, the American Standards Association, but in this new-fangled global society we've gone all international.
For me, ISO control is a secondary control rather than a primary one. That's all in my mind; in the days of film I could only change it once every 24 or 36 shots and I needed a good level of foresight to have a good range of choice with me; now I can use a different level of ISO on every picture if I want, but I still often think of it as a secondary choice. I just think two things is enough to twiddle
Typically, counting bananas very finely makes for worse pictures than counting them coarsely, for reasons I wont go into right now. Keep the ISO setting as low as possible while not letting the shutter speed number get too small.
The Other One
The other wrinkle is that what the camera thinks is right might not actually be right. When the camera measures the amount of light, it gets referred to as metering - using a light meter to make a measurement.
There have been tremendous advances in camera metering since I was a boy. Nevertheless the camera is looking at what you want to photograph and measuring the light being reflected off it. To get a true measure of the light falling on a scene, we need a different sort of light meter, known as an incident light meter, but your camera hasn't got one. It's not incident in the sense of "The Yangtse Incident" but incident as in "incoming".
So, what the camera has to do is make some sort of presumption about the light coming in. The basic presumption is that across the scene the average level of reflected light is a sort of mid-grey level. A lot of the time that's good enough but if you are photographing a black kitten on coal or a white swan on snow then its not, as it will try to render both of them as mid-grey. You can imagine the poor-old metering gets a bit confused if there's sky in the picture, too, as its not sure whether its the prize-winning lawn in the foreground you want properly exposed or the cutely fluffy cloud in the shape of strange potato you once had as a child.
There was a time when we would agonise over metering and cameras are still equipped with three different styles of metering to try and improve our chances. If we're still unsure we can take several photographs ranging from definitely too light to definitely too dark and hope that one in the middle captures what we want.
For now, in such a basic tutorial as this, I'm going to say use the default metering setting and use the exposure compensation button (often marked +/-) if you don't like how the picture turns out. We can explore the other metering settings another time.
The display on the back of the camera is a bit rubbish for evaluating these things, so I'd recommend using the "histogram" function to see whether or not the picture has light evenly from dark to light. However, I'd counsel against obsessively looking at the histogram after every picture - a practice referred to pejoratively as chimping - and instead I'd suggest taking a sequence from dark to light and then later on look at the histograms to decide which to keep. If you have to do something with the display then I'd encourage you to use "highlight blink", which you can find in the manual. This tells you which parts of the picture are blown - have too much light and have gone white. A few little specks are ok but if large slices of sky are blinking, you might like to take in less light - higher aperture number, higher shutter speed number, or both. Certainly if anyone's face is blinking, the picture is a dud. Suck it up, try
again.
5: In Conclusion
The bottom line with all of this is practice, practice, practice. Practice in non-critical situations so you get it right when it matters. It's just the size of the hole and the length of time you leave it open for. Thats all you need to know to be an exposure-meister.
Damian Harty .com
[1] Light levels are actually measured in lux. A lux is 1 lumen per square metre. You might not want to know what a lumen is, but if you do then its the total luminous flux emitted into a solid angle of one steradian if a light source emits one candela of luminous intensity uniformly across that angle. I did say you might not want to know and it's not my fault you kept reading.
[2] While I use a "rain of light" as a metaphor, it's not a bad one. Light comes in little drops called photons and the camera really does count photons. Quite quickly, obviously, since it can count to about 4000 in ten million places, three times over in a single second in the case of a D40 and to about 16000 in twelve million places, ten times a second in the case of D3s. That's a lot of counting.
[3] In a lot of cameras there are some intermediate positions between the numbers above, known as half stops if there is one and third stops if there are two.
[4] I'm being unfair in deriding the early pioneers who worked all this stuff out. How were they to know that the worlds population would grow towards 7 billion and that we'd have cameras on our mobile telephones? By the time its become popular the terminology is too embedded to change, so unfortunately you just have to deal with it. But I am sympathetic about how confusing it looks to an outsider.
[5] Don't worry what this means, well get to it in another lesson.
[6] This is an old school rule of thumb and not any sort of hard and fast boundary, just a helpful thing to keep in mind. If your hobby is being an Olympic marksman, you might have quite a steady hand and will laugh at the 1/focal length rule. If you have some sort of nervous affliction you might find it isn't enough. Its just a guide, ok?
[7] I started using bananas as the unit of light just because it doesn't really matter what the units are - see note [1].


No comments:
Post a Comment